EGL in Mesa

0x1 EGL介绍

我们知道通过OpenGL来绘制的时候需要和EGL配合才能完成渲染,本文主要来介绍一下mesa中的EGL驱动实现。下面先来简单介绍一下EGL。
EGL用于管理绘图表面,其主要提供了下列几种功能,

a 与设备平台的原生窗口系统进行交互。

b 查询可用的绘制类似和相关配置。

c 创建和管理绘制surface。

d 创建和管理绘制context。

e 提供present接口eglSwapBuffers,一般通过交换前后缓存区来实现。

EGL驱动中包括了对下面这些EGL API的封装,应用调用这些API来和EGL驱动交互。

1
2
3
4
5
6
7
8
9
10
11
12
13
14
15
16
17
18
19
20
21
22
23
24
25
26
27
28
29
30
31
32
33
34
35
36
37
38
39
40
41
42
43
44
45
46
eglBindAPI
eglBindTexImage
eglChooseConfig
eglClientWaitSync
eglCopyBuffers
eglCreateContext
eglCreateImage
eglCreatePbufferFromClientBuffer
eglCreatePbufferSurface
eglCreatePixmapSurface
eglCreatePlatformPixmapSurface
eglCreatePlatformWindowSurface
eglCreateSync
eglCreateWindowSurface
eglDestroyContext
eglDestroyImage
eglDestroySurface
eglDestroySync
eglGetConfigAttrib
eglGetConfigs
eglGetCurrentContext
eglGetCurrentDisplay
eglGetCurrentSurface
eglGetDisplay
eglGetError
eglGetPlatformDisplay
eglGetProcAddress
eglGetSyncAttrib
eglInitialize
eglMakeCurrent
eglQueryAPI
eglQueryContext
eglQueryString
eglQuerySurface
eglReleaseTexImage
eglReleaseThread
eglSurfaceAttrib
eglSwapBuffers
eglSwapInterval
eglTerminate
eglWaitClient
eglWaitGL
eglWaitNative
eglWaitSync
MesaGLInteropEGLQueryDeviceInfo
MesaGLInteropEGLExportObject

mesa中egl架构如下图所示。

EGL in Mesa

对上图简单说明如下,
从上图左上角可以看到,EGL需要和具体显示平台的窗口NativeWindow交互。这个NativeWindow需要在应用侧创建好,创建的NativeWindow是根据具体的平台(如Android, X11, Wayland)的不同而不同。这个应用创建好的NativeWindow通过调用eglCreateWindowSurface()传入到egl驱动中。

EGL还需要和绘制缓冲区对象(framebuffer)进行交互,这些缓冲区一般由EGL驱动调用外部窗口系统的提供的接口(如android上的surface)来分配和释放。绘制之前需要先得到空闲的buffer,绘制完成以后需要把buffer送给下一级pipeline,交出控制权。这里面一般会创建2~3个buffer,和下一级pipeline一起循环使用。这些buffer在pipeline的不同阶段流动,控制权也在各个阶段中流转,所以需要一种同步机制来保证buffer何时可读,何时可写,在android上是通过fence机制来保证的。

GL Driver调用EGL的内部接口(getBuffers)来得到当前绘制的目标buffer,然后GL Driver就可以发送绘制命令给GPU硬件,GPU硬件把渲染结果绘制到目标buffer中。

笔者的测试平台是Intel i3,GPU是Gen5xx,通过配置mesa的编译参数,可以编译出GPU平台相关的库是iris_dri.so。
这种配置下mesa中代码调用关系如下图所示。
从下图可以看出,mesa把驱动进行了分层,上面是通用的实现,对具体gpu平台相关实现都封装在xxx_dri.so中,这里Gen5xx平台对应的是iris_dri.so,对broadcom vc4 gpu来说,对应的是vc4_dri.so。

EGL in Mesa

0x2 mesa中egl流程介绍

下图说明了一个OpenGL ES应用程序调用EGL接口来绘制的基本流程。
EGL in Mesa

下面对流程中的egl api调用做详细的说明,

0x21 创建X11平台对应的Display和Window

首先在应用程序中通过下面的代码来创建x11平台上的display和window。

1
2
3
4
5
6
7
8
9
10
11
12
13
14
15
// create display and window for x11 platform
x_display = XOpenDisplay(NULL);
if ( x_display == NULL )
{
return EGL_FALSE;
}
root = DefaultRootWindow(x_display);
win = XCreateWindow(
x_display, root,
0, 0, esContext->width, esContext->height, 0,
CopyFromParent, InputOutput,
CopyFromParent, CWEventMask,
&swa );

0x21 调用eglInitialize

该函数的调用堆栈如下。

EGL in Mesa

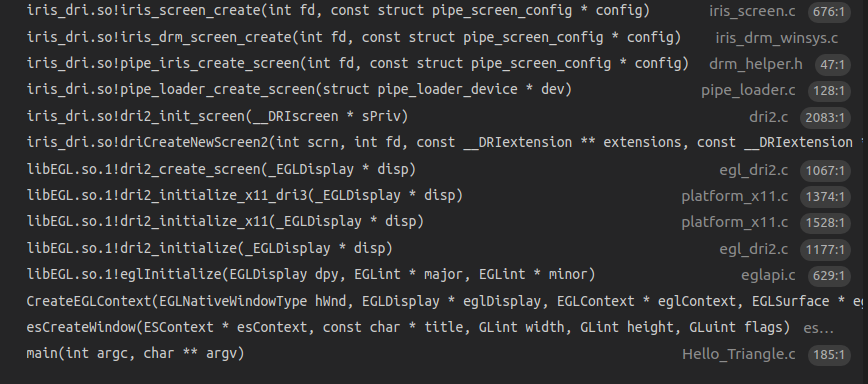
eglInitialize的参数是display,这就是前面调用
平台相关接口得到的x_display。

上面调用堆栈最后调用的函数是iris_screen_create,这是mesa的gallium架构下初始化具体gpu型号的硬件驱动的入口函数。
这个在后续的文章中会做详细的介绍,这里我们知道了应用调用eglInitialize()的时候会去调用具体的gpu型号的硬件驱动。

1
2
3
4
5
6
7
8
// src/gallium/winsys/iris/drm/iris_drm_winsys.c
extern struct pipe_screen *iris_screen_create(int fd, const struct pipe_screen_config *config);
struct pipe_screen *
iris_drm_screen_create(int fd, const struct pipe_screen_config *config)
{
return iris_screen_create(os_dupfd_cloexec(fd), config);
}

下图的调用堆栈说明了eglInitialize调用过程中的gem buffer分配操作。这个操作最后会调用到kernel 驱动中完成内存分配动作。
EGL in Mesa

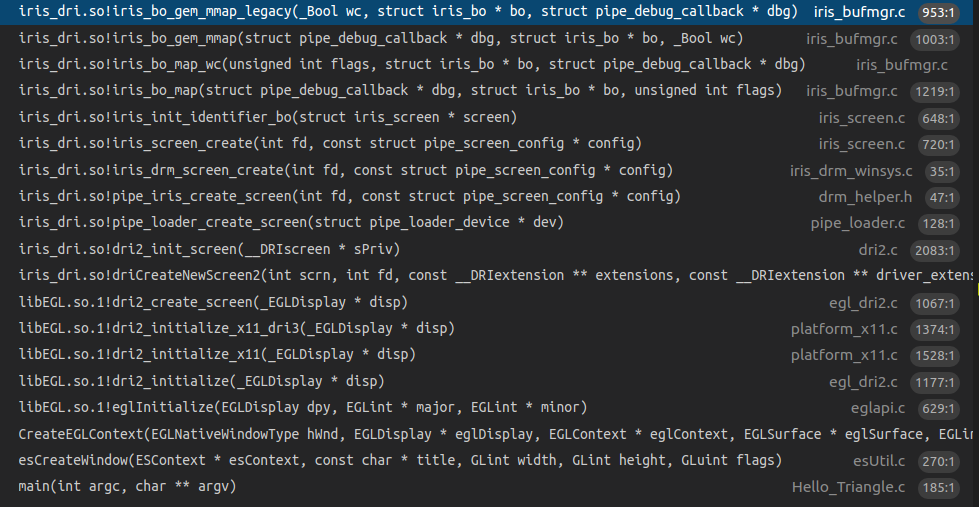
0x22 eglCreateContext的调用流程

eglCreateContext的调用堆栈如下
EGL in Mesa

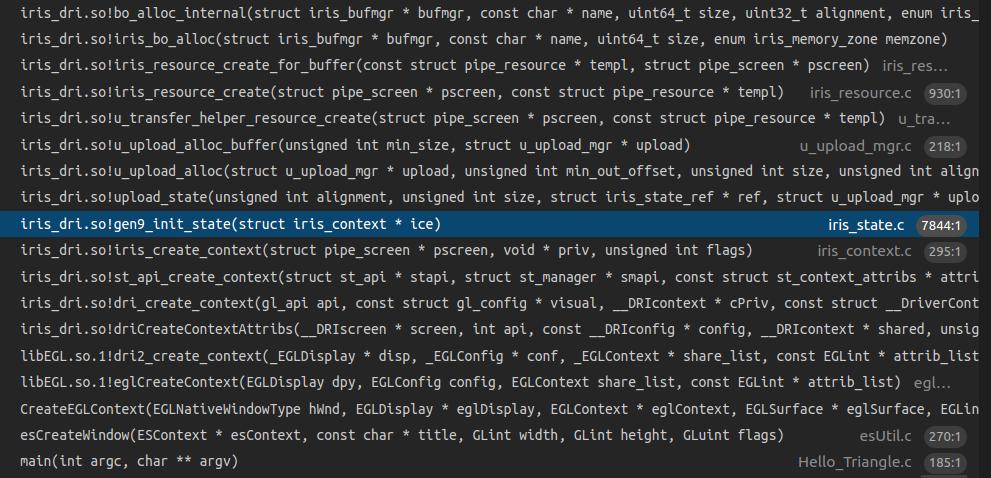
EGL驱动最后会调用到iris driver中创建context的代码中,其中包括了初始化各种函数指针的代码,包括program, clear, blit等操作。

1
2
3
4
5
6
7
8
9
10
11
12
13
14
15
16
17
18
19
20
21
22
23
24
25
26
27
28
29
30
31
32
33
34
35
36
37
38
39
40
41
42
43
44
// src/gallium/drivers/iris/iris_context.c
/**
* Create a context.
*
* This is where each context begins.
*/
struct pipe_context *
iris_create_context(struct pipe_screen *pscreen, void *priv, unsigned flags)
{
struct iris_screen *screen = (struct iris_screen*)pscreen;
const struct gen_device_info *devinfo = &screen->devinfo;
struct iris_context *ice = rzalloc(NULL, struct iris_context);
......
iris_init_context_fence_functions(ctx);
iris_init_blit_functions(ctx);
iris_init_clear_functions(ctx);
iris_init_program_functions(ctx);
iris_init_resource_functions(ctx);
iris_init_flush_functions(ctx);
iris_init_perfquery_functions(ctx);
iris_init_program_cache(ice);
iris_init_border_color_pool(ice);
iris_init_binder(ice);
slab_create_child(&ice->transfer_pool, &screen->transfer_pool);
ice->state.surface_uploader =
u_upload_create(ctx, 16384, PIPE_BIND_CUSTOM, PIPE_USAGE_IMMUTABLE,
IRIS_RESOURCE_FLAG_SURFACE_MEMZONE);
ice->state.dynamic_uploader =
u_upload_create(ctx, 16384, PIPE_BIND_CUSTOM, PIPE_USAGE_IMMUTABLE,
IRIS_RESOURCE_FLAG_DYNAMIC_MEMZONE);
ice->query_buffer_uploader =
u_upload_create(ctx, 4096, PIPE_BIND_CUSTOM, PIPE_USAGE_STAGING,
0);
genX_call(devinfo, init_state, ice);
genX_call(devinfo, init_blorp, ice);
genX_call(devinfo, init_query, ice);
......
return ctx;
}

下面是iris创建context的时候初始化state相关函数指针的代码。

1
2
3
4
5
6
7
8
9
10
11
12
13
14
15
16
17
18
19
20
21
22
23
24
25
26
27
28
29
30
31
32
33
34
35
36
37
38
39
40
41
42
43
44
45
46
47
48
49
50
51
52
53
54
55
56
57
58
59
60
61
62
63
64
65
66
67
68
69
70
71
72
73
74
75
76
77
78
79
80
81
82
83
84
85
86
87
88
89
90
91
// src/gallium/drivers/iris/iris_state.c
void
genX(init_state)(struct iris_context *ice)
{
struct pipe_context *ctx = &ice->ctx;
struct iris_screen *screen = (struct iris_screen *)ctx->screen;
ctx->create_blend_state = iris_create_blend_state;
ctx->create_depth_stencil_alpha_state = iris_create_zsa_state;
ctx->create_rasterizer_state = iris_create_rasterizer_state;
ctx->create_sampler_state = iris_create_sampler_state;
ctx->create_sampler_view = iris_create_sampler_view;
ctx->create_surface = iris_create_surface;
ctx->create_vertex_elements_state = iris_create_vertex_elements;
ctx->bind_blend_state = iris_bind_blend_state;
ctx->bind_depth_stencil_alpha_state = iris_bind_zsa_state;
ctx->bind_sampler_states = iris_bind_sampler_states;
ctx->bind_rasterizer_state = iris_bind_rasterizer_state;
ctx->bind_vertex_elements_state = iris_bind_vertex_elements_state;
ctx->delete_blend_state = iris_delete_state;
ctx->delete_depth_stencil_alpha_state = iris_delete_state;
ctx->delete_rasterizer_state = iris_delete_state;
ctx->delete_sampler_state = iris_delete_state;
ctx->delete_vertex_elements_state = iris_delete_state;
ctx->set_blend_color = iris_set_blend_color;
ctx->set_clip_state = iris_set_clip_state;
ctx->set_constant_buffer = iris_set_constant_buffer;
ctx->set_shader_buffers = iris_set_shader_buffers;
ctx->set_shader_images = iris_set_shader_images;
ctx->set_sampler_views = iris_set_sampler_views;
ctx->set_compute_resources = iris_set_compute_resources;
ctx->set_global_binding = iris_set_global_binding;
ctx->set_tess_state = iris_set_tess_state;
ctx->set_framebuffer_state = iris_set_framebuffer_state;
ctx->set_polygon_stipple = iris_set_polygon_stipple;
ctx->set_sample_mask = iris_set_sample_mask;
ctx->set_scissor_states = iris_set_scissor_states;
ctx->set_stencil_ref = iris_set_stencil_ref;
ctx->set_vertex_buffers = iris_set_vertex_buffers;
ctx->set_viewport_states = iris_set_viewport_states;
ctx->sampler_view_destroy = iris_sampler_view_destroy;
ctx->surface_destroy = iris_surface_destroy;
ctx->draw_vbo = iris_draw_vbo;
ctx->launch_grid = iris_launch_grid;
ctx->create_stream_output_target = iris_create_stream_output_target;
ctx->stream_output_target_destroy = iris_stream_output_target_destroy;
ctx->set_stream_output_targets = iris_set_stream_output_targets;
ctx->set_frontend_noop = iris_set_frontend_noop;
screen->vtbl.destroy_state = iris_destroy_state;
screen->vtbl.init_render_context = iris_init_render_context;
screen->vtbl.init_compute_context = iris_init_compute_context;
screen->vtbl.upload_render_state = iris_upload_render_state;
screen->vtbl.update_surface_base_address = iris_update_surface_base_address;
screen->vtbl.upload_compute_state = iris_upload_compute_state;
screen->vtbl.emit_raw_pipe_control = iris_emit_raw_pipe_control;
screen->vtbl.emit_mi_report_perf_count = iris_emit_mi_report_perf_count;
screen->vtbl.rebind_buffer = iris_rebind_buffer;
screen->vtbl.load_register_reg32 = iris_load_register_reg32;
screen->vtbl.load_register_reg64 = iris_load_register_reg64;
screen->vtbl.load_register_imm32 = iris_load_register_imm32;
screen->vtbl.load_register_imm64 = iris_load_register_imm64;
screen->vtbl.load_register_mem32 = iris_load_register_mem32;
screen->vtbl.load_register_mem64 = iris_load_register_mem64;
screen->vtbl.store_register_mem32 = iris_store_register_mem32;
screen->vtbl.store_register_mem64 = iris_store_register_mem64;
screen->vtbl.store_data_imm32 = iris_store_data_imm32;
screen->vtbl.store_data_imm64 = iris_store_data_imm64;
screen->vtbl.copy_mem_mem = iris_copy_mem_mem;
screen->vtbl.derived_program_state_size = iris_derived_program_state_size;
screen->vtbl.store_derived_program_state = iris_store_derived_program_state;
screen->vtbl.create_so_decl_list = iris_create_so_decl_list;
screen->vtbl.populate_vs_key = iris_populate_vs_key;
screen->vtbl.populate_tcs_key = iris_populate_tcs_key;
screen->vtbl.populate_tes_key = iris_populate_tes_key;
screen->vtbl.populate_gs_key = iris_populate_gs_key;
screen->vtbl.populate_fs_key = iris_populate_fs_key;
screen->vtbl.populate_cs_key = iris_populate_cs_key;
screen->vtbl.lost_genx_state = iris_lost_genx_state;
ice->state.dirty = ~0ull;
ice->state.stage_dirty = ~0ull;
ice->state.statistics_counters_enabled = true;
ice->state.sample_mask = 0xffff;
ice->state.num_viewports = 1;
ice->state.prim_mode = PIPE_PRIM_MAX;
ice->state.genx = calloc(1, sizeof(struct iris_genx_state));
ice->draw.derived_params.drawid = -1;
}

0x23 和外部NativeWindow的交互

主要是buffer的管理, 通过dequeueBuffer取得空闲buffer供本次绘制使用,在绘制完成了以后,再调用queueBuffer把buffer送去显示。另外外部NativeWindow大小发生变化的时候,也需要调用相应的接口来通知mesa,这个时候一般的流程是先把前面分配的旧的大小的buffer释放掉,然后重新去分配新的大小的buffer,另外还需要调用glViewPort重新设置draw区域的viewport大小。

0x24 gl driver如何取得当前绘制的buffer

GL Driver调用EGL的内部接口(getBuffers)来得到当前绘制的目标buffer。

下图是eglMakeCurrent函数执行的时候分配绘制buffer的堆栈。

EGL in Mesa

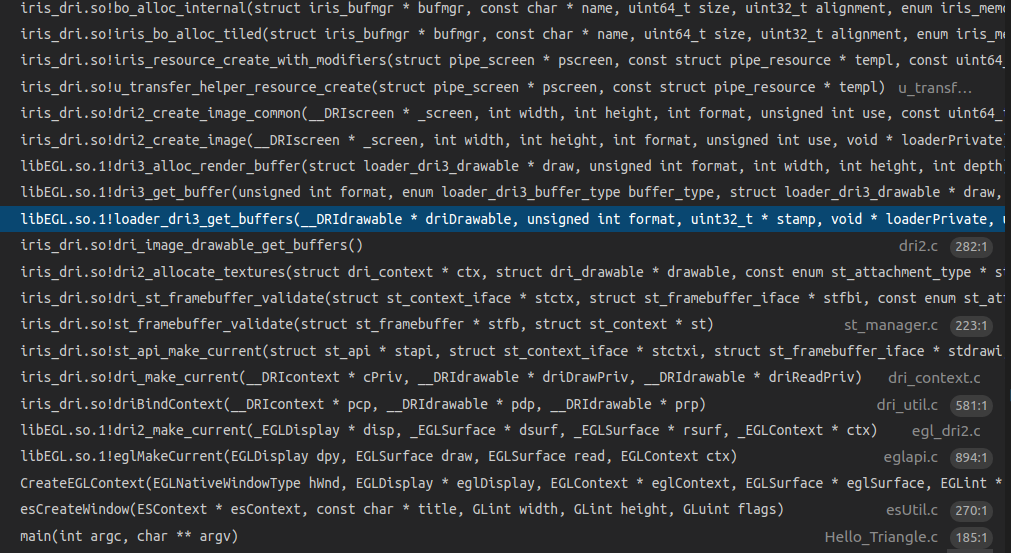
具体的调用代码如下所示,外部通过getBuffers来调用具体egl driver的buffer接口。对x11_dr3而言,最后调用的函数是loader_dri3_get_buffers,在这个时候会返回需要的buffer,如果有必要也会重新分配buffer。
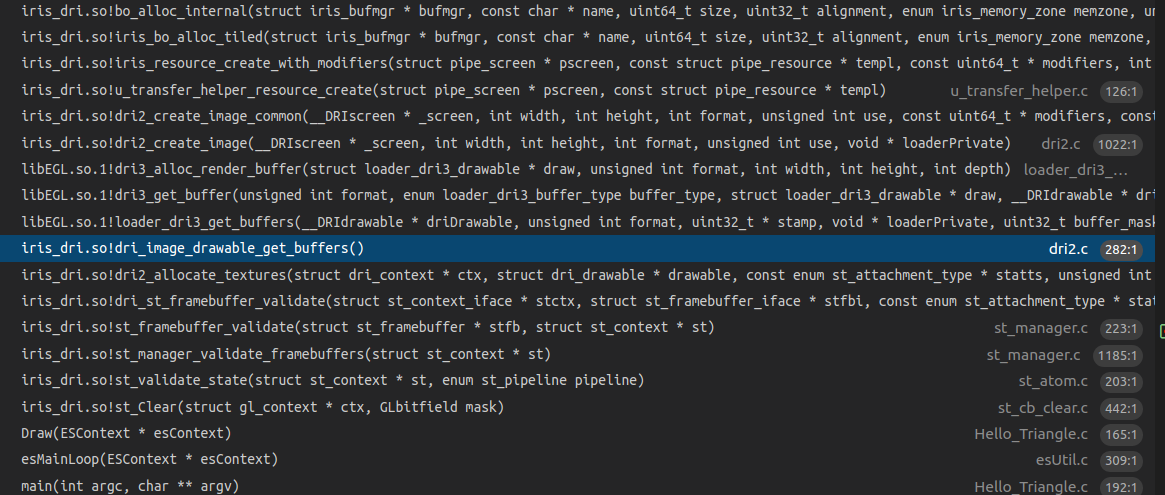
1
2
3
4
5
6
7
8
9
10
11
12
13
14
15
16
17
18
19
20
21
22
23
24
25
26
27
28
29
30
31
32
33
34
35
36
37
38
39
40
41
42
43
44
45
46
47
48
49
50
51
52
53
54
55
56
57
58
59
60
61
62
63
64
65
66
67
68
69
70
71
72
73
// src/egl/drivers/dri2/platform_x11_dri3.c
const __DRIimageLoaderExtension dri3_image_loader_extension = {
.base = { __DRI_IMAGE_LOADER, 1 },
.getBuffers = loader_dri3_get_buffers,
.flushFrontBuffer = dri3_flush_front_buffer,
};
// src/loader/loader_dri3_helper.c
/** loader_dri3_get_buffers
*
* The published buffer allocation API.
* Returns all of the necessary buffers, allocating
* as needed.
*/
int
loader_dri3_get_buffers(__DRIdrawable *driDrawable,
unsigned int format,
uint32_t *stamp,
void *loaderPrivate,
uint32_t buffer_mask,
struct __DRIimageList *buffers)
{
......
if (!dri3_update_drawable(draw))
return false;
dri3_update_num_back(draw);
/* Free no longer needed back buffers */
for (buf_id = draw->num_back; buf_id < LOADER_DRI3_MAX_BACK; buf_id++) {
if (draw->cur_blit_source != buf_id && draw->buffers[buf_id]) {
dri3_free_render_buffer(draw, draw->buffers[buf_id]);
draw->buffers[buf_id] = NULL;
}
}
/* pixmaps always have front buffers.
* Exchange swaps also mandate fake front buffers.
*/
if (draw->is_pixmap || draw->swap_method == __DRI_ATTRIB_SWAP_EXCHANGE)
buffer_mask |= __DRI_IMAGE_BUFFER_FRONT;
if (buffer_mask & __DRI_IMAGE_BUFFER_FRONT) {
/* All pixmaps are owned by the server gpu.
* When we use a different gpu, we can't use the pixmap
* as buffer since it is potentially tiled a way
* our device can't understand. In this case, use
* a fake front buffer. Hopefully the pixmap
* content will get synced with the fake front
* buffer.
*/
if (draw->is_pixmap && !draw->is_different_gpu)
front = dri3_get_pixmap_buffer(driDrawable,
format,
loader_dri3_buffer_front,
draw);
else
front = dri3_get_buffer(driDrawable,
format,
loader_dri3_buffer_front,
draw);
if (!front)
return false;
} else {
dri3_free_buffers(driDrawable, loader_dri3_buffer_front, draw);
draw->have_fake_front = 0;
}
......
return true;
}

0x25 glClear

glClear的调用堆栈如下,可以看到这个时候也需要分配buffer。

EGL in Mesa

0x26 eglswapbuffer流程

EGL in Mesa
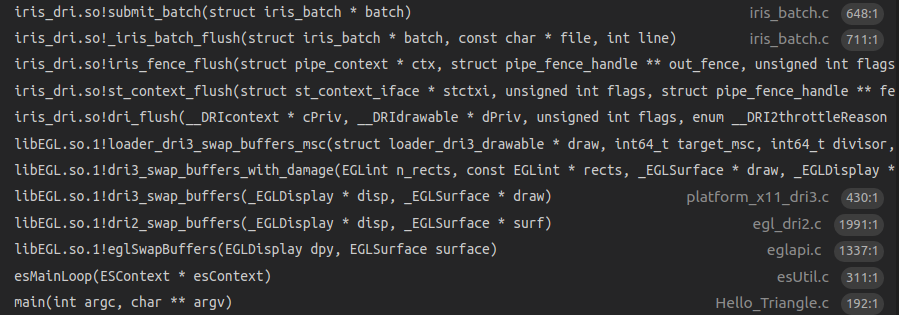
通过调用相关的OpenGL ES API,把需要的绘制资源,如顶点数据(VBO/VAO等),纹理资源(glTexImage2D)等准备好,mesa内部也构造好了对应GPU需要执行的command,这个时候可以启动GPU来绘制了。在函数submit_batch中通过调用DRM_IOCTL_I915_GEM_EXECBUFFER2 ioctl命令来启动kernel的绘制动作。

0x27 egl驱动中实现的其他功能,如chooseConfig

这部分主要是软件逻辑,根据硬件平台的能力,对configure进行管理。